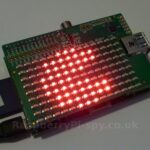
 In my previous post about the Pi-Lite I explained how to set it up and how you could display scrolling text in Python. In this post I will explain how to create custom 14×9 pictures and then send them to the Pi-Lite. This is the same technique used to create the Pac Man image to the right.
The Pi-Lite has a frame buffer feature which allows you to send it data which determines the state of each LED. You can set each LED to be on or off and once all your data has been received the Pi-Lite sets the LEDs as instructed.
This command is a string of 126 ones and zeros. The string defines the top left LED and then works down the first column. It then defines the second and so on until all 126 LEDs have been set to either a 1 or 0.
Example Python Script
Here is an example Python script which defines two sprites , displays them and then quits.
#!/usr/bin/env python

import serial
import time

# Define two sprites
sprite1 = '000000000000000000000011110000100010111001001100100101010010101010010101100100101111001001000100010000011110000000000000000000'
sprite2 = '000000000000000000000000000000011111011111111111111111110011111110011111111111111011111111000011111000000000000000000000000000'

# Configure Pi serial port
s = serial.Serial()
s.baudrate = 9600
s.timeout = 0
s.port = "/dev/ttyAMA0"

try:
    # Open serial port
    s.open()
except serial.SerialException, e:
    # There was an error
    sys.stderr.write("could not open port %r: %s\n" % (port, e))
    sys.exit(1)

print "Serial port ready"

# Clear display
s.write("$$$ALL,OFF\r")

# Send Sprite 1 to the Pi-Lite
print "Sprite 1"
s.write('$$$F' + sprite1 + '\r')

# Short delay
time.sleep(2)

# Send Sprite 2 to the Pi-Lite
print "Sprite 2"
s.write('$$$F' + sprite2 + '\r')

# Short delay
time.sleep(2)

# Quit
print "Good bye"
The 126 character sprite string has “$$$F” added to the beginning and a carriage return added at the end to form a complete Pi-Lite command. This command is sent to the Pi-Lite over the Pi’s serial port using the “s.write” command just as we did for the scrolling text example.
Example Animation With Two Frames
In the example below two frames are defined using a Python list. We can display paddlock[0] and paddlock[1] in response to the user pressing Enter. It is using the same technique as above to send the frames to the Pi-Lite but this time within a While Loop.
The first frame is a simple padlock image. The second frame is an unlocked padlock.
#!/usr/bin/env python
import serial
import time

# Define padlock list containing two sprites
padlock = ['000000000000000000000000000000011111011111111111111111110011111110011111111111111011111111000011111000000000000000000000000000',
            '011100000111100000110000000110011111111111111011111111000011111000011111000011111000011111000011111000000000000000000000000000']

# Define list to describe each sprite
description = ['Locked','Unlocked']

# Configure Pi serial port
s = serial.Serial()
s.baudrate = 9600
s.timeout = 0
s.port = "/dev/ttyAMA0"

try:
    # Open serial port
    s.open()
except serial.SerialException, e:
    # There was an error
    sys.stderr.write("could not open port %r: %s\n" % (port, e))
    sys.exit(1)

print "Serial port ready"

# Clear display
s.write("$$$ALL,OFF\r")

# Initialise some variables
loop  = True
frame = 0

while loop:

    s.write('$$$F' + padlock[frame] + '\r')
    print description[frame]

    inp = raw_input("Press [Enter] to toggle padlock. [x-Enter] to quit.")

    if inp.lower()!="x":
      # Toggle frame to display
      frame = 1 - frame
    else:
      # Exit loop
      loop = False

# Quit
print "Good bye"
You could send frames to the Pi-Lite without any user intervention or combine custom sprites with scrolling text. The possibilities are endless.
Sprite Creation The Easy Way
Thinking of sprites and typing out 126 characters isn’t easy. Drawing them out on graph paper doesn’t make it much easier. So to speed up the process I created an online tool that allows you to draw your picture using the mouse. The 126 character string is generated automatically and you can then paste it into your Python script.
The tool’s interface looks something like this :
![]()
Click the image to access the sprite tool. I used it to create the sprites used in the Python examples above. With a bit of imagination and experimentation you can create some interesting designs and animations.
Create your own images and cut-n-paste the textbox contents into the example scripts. You can always build larger Python lists to store more frames.
Although the Pi-Lite is a limited size it is a great way to create a display system using a Raspberry Pi. It’s great to have the ability to create your own sprites and combine them with scrolling text within a minimum of code or hardware.
Script Downloads
Rather than cutting-n-pasting the above code you can also download the two scripts directly to your Pi using :
wget https://bitbucket.org/MattHawkinsUK/rpispy-pi-lite/raw/master/pi_lite_custom_1.py
and :
wget https://bitbucket.org/MattHawkinsUK/rpispy-pi-lite/raw/master/pi_lite_custom_2.py
Or if you use Git on your Pi grab all my Pi-Lite example scripts by cloning my Pi-Lite repository on BitBucket :
git clone https://bitbucket.org/MattHawkinsUK/rpispy-pi-lite.git


